Zombie Toss: Create A Plants VS Zombies Inspired Halloween Game
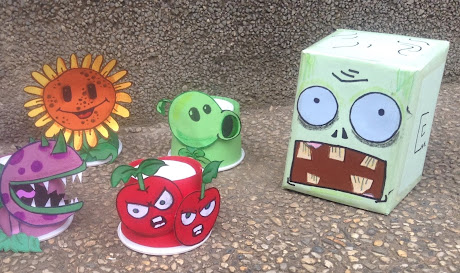
This year, for some fun this Halloween season, I made this game that me and Lauren played inspired and involving characters from the popular tower defense game "Plants VS Zombies". I call this game "zombie toss", I use a small empty cardboard box to create a zombie head that will be used to toss onto the plant characters. I used small disposable cups as stand of the plant characters. The cups hold prizes inside them that anyone can get from knocking down any of the plant characters.
DISCLOSURE: This blog and post contains affiliate links. This means I may earn a commission should you chose to sign up for a program or make a purchase using my link. Thank you so much for your support!
ABOUT THIS GAME
I was thinking about Halloween themes for a DIY I could do this year just to enjoy the Halloween season and I remember "Plants VS Zombies", I have been playing this game on the computer in the past and it's one of the games I really like. I love the concept and I thought the zombie characters goes well with Halloween so I decided to use it as inspiration for this DIY game.
I was thinking about Halloween themes for a DIY I could do this year just to enjoy the Halloween season and I remember "Plants VS Zombies", I have been playing this game on the computer in the past and it's one of the games I really like. I love the concept and I thought the zombie characters goes well with Halloween so I decided to use it as inspiration for this DIY game.
CREATING THE PLANT CHARACTERS + LINKS TO PRINTABLE CHARACTERS
I started making my handmade plant pieces for the game about 2 weeks before Halloween, I chose and made 6 characters as seen below (citron, sunflower, peashooter, chomper, electric blueberry & cherry bomb) I look at plant characters from "Plants VS Zombies" and draw them. I made my characters one at a time on my free time until all are DONE.
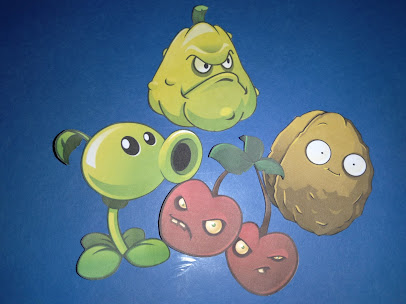
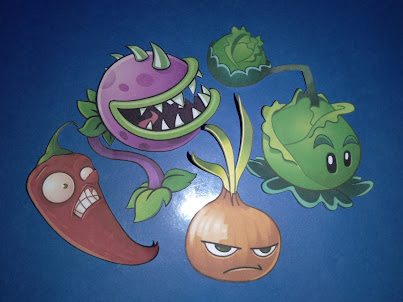
It takes time if you are going to create the characters by hand like I did but here I have put together 4 sets of plant characters from "Plants VS Zombies" that you can print immediately to use in creating your plant game pieces, check them out by clicking on the links below.
Plant Characters (Set 1): Bloomerang, Power Lily, Garlic & Citron
Plant Characters (Set 2): Squash, Peashooter, Cherry Bomb & Wall-nut
Plant Characters (Set 3): Jalapeno, Chomper, Stunion & Cabbage-pult
Plant Characters (Set 4): Bonk Choy, Sunflower & Kernel-pult
You may create any number of plant pieces according to your preference, print on heavy weight paper. Check out the step by step guide below on how to print these plant character pieces in the size that will suit this DIY.
PRINTING THE PLANT CHARACTER PIECES:
#1: Download your chosen set of plant character pieces by checking out the links above.
#2: Open downloaded file and click on the "printer" icon.
#3: In the printing settings, make sure the settings are as follows: "layout" portrait ; "paper size" A4 ; "scale (%)" fit to printable area. Next, click on "print".
#4: Cut out all the pieces and set aside.
CREATING THE CHARACTER STAND + LINK TO FREE PRINTABLE TEMPLATE
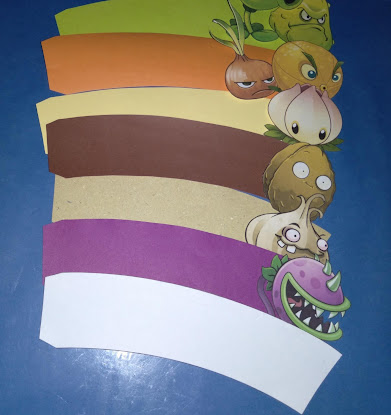
We are going to use small disposable cups (3.5 oz sauce or salad cups) as stand for the plant character pieces. You can use either white or clear small disposable cups. Wrap the cup body with construction paper in the same or similar color of the character that will be glued to it, Click Here To Check Out FREE Printable Cup Sleeve Template.
Check out the step by step guide below on how to print the cup sleeve template in the size that will fit the 3.5 oz disposable cup we are using.
PRINTING THE CUP SLEEVE TEMPLATE:
#1: Download the cup sleeve template by checking out the link shared above.
#2: Open downloaded file and click on "printer" icon.
#3: In the printing settings, make sure the settings are as follows: "layout" landscape ; "paper size" A4 ; "scale (%)" type 83 in the box. Next, click on "print".
#4: Cut pattern to use as tracing guide on different construction papers to be used.
CREATING THE ZOMBIE HEAD + LINK TO FREE PRINTABLE
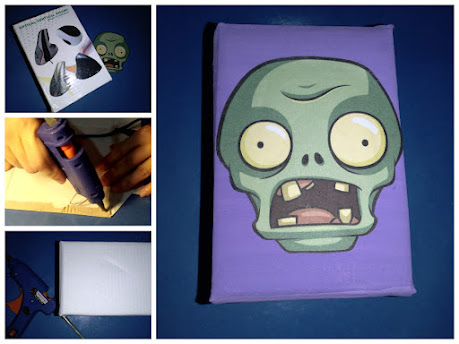
I am using a small empty cardboard box for my zombie head that I created by hand. Since, I ran out of paint at that time I made it, I covered my box with paper instead then draw and glue the details on it one by one.
Check Out Plants VS Zombies Merchandise @ shopee.ph!
To easily create yours, just paint a small to medium sized cardboard box in any color of choice, Click Here To Check Out Printable Zombie Head that you can glue onto your box. Below is a sample zombie box I made using the printable. I am using a small box with length of 5 inches and width of 3.5 inches.
Check out the step by step guide below on how to print the zombie head in the size that will fit a small sized box.
PRINTING THE ZOMBIE HEAD:
#1: Download the printable zombie head by checking out the link shared above.
#2: Open downloaded file and click on "printer" icon.
#3: In the printing settings, make sure the settings are as follows: "layout" landscape ; "paper size" A4 ; "scale (%)" type 85 in the box. Next, click on "print".
#4: Cut image to glue on box.
LABELING THE CUPS
Print or write the names of the treats or prizes for the game on a bond paper, cut and tape them inside the cups. You can have chocolates, candies, biscuits, or Halloween related toys as prizes for the game. I had biscuits and other non-chocolate and non-candy snacks as prizes for our game.
Print or write the names of the treats or prizes for the game on a bond paper, cut and tape them inside the cups. You can have chocolates, candies, biscuits, or Halloween related toys as prizes for the game. I had biscuits and other non-chocolate and non-candy snacks as prizes for our game.
To play the game, position the plant characters together and have each player toss the zombie head onto the characters to knock it down. Each player can have 2-3 chances to toss the zombie head, to hopefully knock down any character and get the surprise treat inside any of it.
Whatever character a player is able to knock down, they can get the prizes in it. Once all cups are tumbled and taken, the game is DONE. You can replay it and replace the taken treats inside each cups with new ones. In our first play, Lauren got 3 of the prizes in the 6 plant characters and I got the other 3. It was really a fun game to play.
HOW TO EASILY CREATE YOUR "ZOMBIE TOSS" GAME
Try and create your own and have fun with your kids this Halloween season. Below is the sample "zombie toss" game pieces I created using the printables.STEP #1: Prepare small cardboard box (cut and invert to the inside if box is printed, glue back together using hot glue), prepare small disposable cups (3.5 oz sauce/salad cups), print any chosen plant characters, cup sleeve template and zombie head by clicking on the links shared above. Cut printables and set aside.
STEP #2: Trace cup sleeve pattern on construction papers with same or similar colors to chosen plant characters and paint the small cardboard box in any color of choice, set aside.
STEP #3: Wrap small disposable cups with cup sleeves using scotch tape, next glue the plant characters onto the front of cup using hot melt glue. Next, glue zombie head onto the box using dry glue stick.
STEP #4: Print or write game prize labels, cut and tape inside the cups. Your "zombie toss" game pieces are all DONE. It's time to play and have some FUN!
MATERIALS FOR THIS DIY
* printer ; * small to medium sized empty cardboard box ; * 3.5 oz small disposable cups (sauce/salad cups) ; * white heavy weight paper (specialty board, vellum board or any paper with a similar texture) ; * assorted construction papers ; * scotch tape ; scissors * solid glue stick ; * hot melt glue ; * glue gun ; * paint (acrylic paint, poster paint or tempera paint) ; * paint brush
GET A LOW-COST AND QUALITY PRINTER FOR HOME PRINTING
Print FREE printables for home DIYs and more! I'm using "HP Ink Tank 115" single function inkjet printer in printing templates and printables, I bought it online at shopee.ph. It is a quality and low-cost printer for home printing that uses tank for the ink.
Check Out "HP Original Ink" or "HP Compatible Premium Refill Ink" @ shopee.ph
Check Out "HP Ink Tank 115 Single Function Printer" @ shopee.ph
Check Out "HP Ink Tank 115 Single Function Printer" @ shopee.ph
It needs a total of 4 ink bottles (CMYK) to refill the tank, you can save even more by refilling with universal ink. Just make sure the ink is compatible with the printer model before deciding on a purchase.
I'D LOVE TO HEAR FROM YOU
POST UPDATED: October 2021
A little support goes a long way! If you’d like to help us keep creating, you can do so at https://ko-fi.com/kreativone





Comments
Post a Comment