DIY "Christmas Fairy" Themed Hanging Triangle Paper Christmas Tree Decoration: Wreath & Christmas Tree In One!
Christmas is just around the corner, I never planned this but I just thought recently to create a Christmas tree that I could hang or stick on the wall. This Christmas Tree is structured like a wreath but in a triangle shape so it would also be like a Christmas Tree.
DISCLOSURE: This blog and post contains affiliate links. This means I may earn a commission should you chose to sign up for a program or make a purchase using my link. Thank you so much for your support!
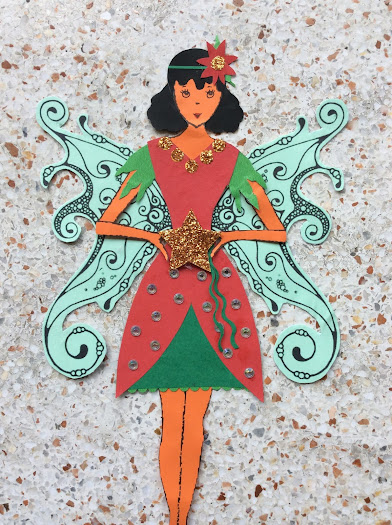
I used empty box cardboard for its structure and construction papers for the leaves and the decorations around it. I chose "Christmas Fairy" as a theme, I had a Christmas fairy holding a star on top and some little Christmas fairies, poinsettia flowers, and paper Christmas ornaments all around it.
CREATING AND COVERING THE TRIANGLE STRUCTURE + LINK TO PRINTABLE LEAF PATTERN
#1: To create the structure, I cut some empty box cardboards into long rectangular strips and just connect them together forming a triangle using hot melt glue, I added a small trunk in the middle bottom of my triangle to make it look like a tree. I wrapped the trunk with brown paper rope or twine.
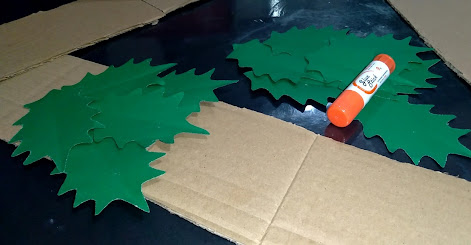
#2: Next, I proceed to fill the triangle cardboard structure with leaves all over it, I used a "poinsettia leaf" pattern for the leaves which I traced on dark green construction papers. Before gluing the leaves on the structure I folded each one in the middle to give it a 3D effect.
Only apply glue at the back top area of each leaf then glue the next succeeding leaves from under each leaf so the outcome of the whole tree is not totally flat and the leaves look freely hanging and are overlapping each other.
After filling the whole structure with paper leaves, I glued a silver gem sticker in the middle of each leaf to add some sparkle to it. Check out the link below for the leaf pattern I used.
PRINTING AND RESIZING THE LEAF PATTERN:
#1: Check Out The Printable Poinsettia Leaf Template Here, just right-click on the poinsettia leaf pattern image to save to your computer, this is a large image so I change the image size before printing to make it smaller and just right for the triangle structure I have.
#2: Locate the image on your computer and double click on it, in the picture viewer click on the "printer" icon.
#3: In the printer dialog box, go to "photo size" and choose the right size you prefer for your leaf pattern then click on "print".
#4: Cut the pattern and trace on a green paper, you can fold the paper you will use several times creating multiple sections in it, next trace the leaf pattern on top of the folded paper then cut to reveal several leaves in one cutting.
CUSTOMIZING A CHRISTMAS FAIRY IMAGE AS TREE TOPPER + LINK TO FREE DOWNLOADS
I use this Fairy Outline Template to create my fairy on top, I cut the hair and created my own hair for it, I also altered the arms to make it hold a star in the middle. To save time, you can also use Christmas fairy images or cliparts to add immediately at top of your tree.
Check out the links below for some FREE download Christmas fairy images. These fairy selections are great to add as toppers for your tree, simply glue a star onto the hands of these fairy images like they are holding it and transform them into Christmas fairy toppers for your paper tree!
You can also get extra creative by gluing in additional details anywhere on your Christmas fairy topper (example: on hair, clothes, etc.) using gem stickers or shape sequins to spice them up even more and make them personal.
Click Here To Check Out FREE Printable Gold Stars in various sizes, you may add additional gold dust onto these gold stars to enhance it and for extra glitter. Spread solid glue or a little amount of white glue on top then sprinkle some gold dust, glue onto the hand area of your chosen Christmas fairy like they are holding the star.
ADDITIONAL CHRISTMAS FAIRY ORNAMENTS + LINK TO FREE DOWNLOADS
I used a Doll Body Clipart as bodies for my little Christmas fairy ornaments. I customized some facial details such as their noses and lips as well as hair of the girl. Check out the links below for some FREE download Christmas fairy images you can print and use immediately as additional Christmas fairy ornaments for your paper Christmas tree.
These selection of fairies are easy to cut, print it on a heavy weight paper such as cardstock, vellum board, specialty board or any paper of similar texture. Add a scotch tape with adhesive side up at the back top of each fairy ornament and stick or decorate anywhere on your paper Christmas tree from the back of a leaf.
Download Christmas fairies of choice and insert image into Microsoft Word document. In Microsoft Word, right-click on image and in the pop up that appears choose "wrap text" then "in front of text". Next drag the point on any side of the image to resize into desired size before printing that will fit best with your paper Christmas tree.
Get extra creative with your fairy ornaments by gluing in additional details anywhere on your fairies (example: on hair, clothes, etc.) using gem stickers or shape sequins (stars, circles or flowers) to spice them up even more and make them personal.
PAPER POINSETTIA ORNAMENTS + LINK TO PRINTABLE TEMPLATE
I use a poinsettia template to create my poinsettia flowers, Check Out FREE Printable Poinsettia Pattern Here. Print on a red construction paper, you may custom scale to your desired size in the settings before printing. To create a 3D effect, make a fold in the middle of each petal, I simply added a yellow bead in the middle of each flowers to complete them.
PAPER CHRISTMAS ORNAMENTS + LINK TO PRINTABLE VARIOUS PAPER ORNAMENTS
I am using a blank round and teardrop shape paper Christmas ornaments and printed them on pattern paper, Click Here To Check Out FREE Printable Christmas Tree Ornaments I used or you may Click Here For FREE Printable 100 Colored Christmas Ornaments in various shapes, colors and pattern designs that you can just cut and tape immediately onto your tree, you may scale the ornaments of choice to about "70" or "60" before printing. Attach the ornaments using scotch tape to the back of a leaf.
ATTACHING THE PAPER CHRISTMAS TREE ON THE WALL
I sew 2 double white threads from the back top of my tree, cut the thread in the right length and tie it around something from the top to display the tree on the wall. You can also attach something like a hook on the wall and tie or hang your paper Christmas tree from there.
I use white thread because it looks invisible against a wall and makes the displayed paper tree look neat like you just stick it there. Create your own version of this triangle cardboard and paper Christmas wreath and tree in one!
* printer ; * empty box cardboards ; * regular scissors ; * craft scissors (wavy or scallop) ; * brown paper twine ; * hot melt glue ; * glue gun ; * white heavy weight paper ; * assorted construction papers ; * white glue or solid glue stick ; * sequins (star shape or round) ; * gem stickers ; * gold or silver glitter dust * scotch tape * white thread
GET A LOW-COST QUALITY PRINTER FOR HOME PRINTING!
Print FREE printables for home DIYs and more! I'm using "HP Ink Tank 115" single function inkjet printer in printing templates and printables, I bought it online at shopee.ph. It is a quality and low-cost printer for home printing that uses tank for the ink.
Check Out "HP Original Ink" or "HP Compatible Premium Refill Ink" @ shopee.ph
Check Out "HP Ink Tank 115 Single Function Printer" @ shopee.ph
Check Out "HP Ink Tank 115 Single Function Printer" @ shopee.ph
It needs a total of 4 ink bottles (CMYK) to refill the tank, you can save even more by refilling with universal ink. Just make sure the ink is compatible with the printer model before deciding on a purchase.
I'D LOVE TO HEAR FROM YOU!
If you got any thoughts or questions regarding this DIY, feel free to interact and write it down in the comment box below. I'd be happy to hear from you. Thank you so much for viewing and reading.
POST UPDATED: June 2025
If you enjoy what we do, consider supporting us on Ko-fi! Every little bit means the world! https://ko-fi.com/kreativone


Comments
Post a Comment