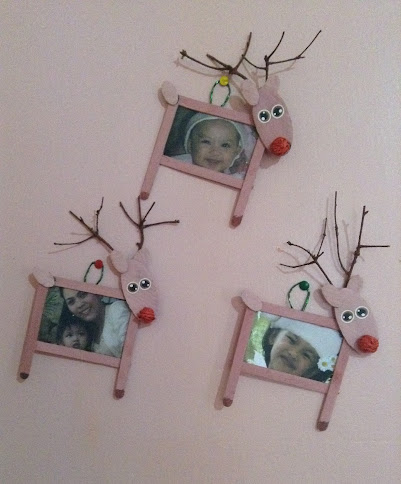
Christmas | Animal Craft: Easy Craft Stick Reindeer Frame + Link To FREE Printable!
This was a craft project that Lauren did in Brightly Beaming Resources' (Step 2: Letter of the Week) homeschool curriculum for the "r" sound as in "rain", Click Here To Find Out Why We Are Doing Homeschooling. I chose "reindeer" for the project that she is going to make, I think it's perfect as it is not only related to the "r" sound but Christmas as well as we made this project during the Christmas season.

DISCLOSURE: This blog and post contains affiliate links. This means I may earn a commission should you chose to sign up for a program or make a purchase using my link. Thank you so much for your support!
I saw this "Reindeer Frames" craft that they did in this BLOG HERE that we want to do. They didn't have any instructions on how they made this craft so I just go ahead and put together the things we need so we can create our own reindeer frames. Here, I will share alternative ideas, enumerate the materials used and steps on how to easily create your own fun "reindeer frames" as well.
READY FOR KID BEFORE STARTING ACTIVITY ALONG WITH OTHER MATERIALS
* cut head, ear, and tail cardboard patterns
* cut reindeer paper eyes
* cut out pictures
* cut out pictures
DONE BY PARENTS
* REINDEER HEAD, EARS & TAILS: I have put together this set of reindeer head, ears and tail patterns from the computer. I printed the pattern to use as a tracing guide to trace onto a cardboard material of an empty box, Click Here To Check Out The Reindeer Head, Ears And Tail Patterns. Cut the cardboard patterns to get them ready for painting by the kids.
* REINDEER EYES: I made some reindeer eyes on the computer as well, these are the eyes that will be glued on the reindeer heads. Click Here To Check Out The Printable Reindeer Eyes, cut the eyes to get it ready for the kids to glue on reindeer head
* ANTLERS: Take some small twigs from a plant, preferably one that is woody and somewhat brownish in color that resembles a reindeer's antler.
ALTERNATIVE IDEAS
Some of the materials in making this craft were not available to us at the time we made this activity (like googly eyes and pom poms), so I just try other ways and some other things that I can find around at home as an alternative to these materials.
Some of the materials in making this craft were not available to us at the time we made this activity (like googly eyes and pom poms), so I just try other ways and some other things that I can find around at home as an alternative to these materials.
* ANTLERS: You can also use bamboo skewers (if you have them) as antlers, take a bamboo skewer and cut it into small pieces then form the pieces together using glue gun resembling a reindeer's antler.
* REINDEER EYES: You may use googly eyes if you have them if not Click Here To Check Out The Printable Reindeer Eyes we used.
* REINDEER NOSE: I use red paper rope. I just roll the strand on my finger to create a small ball just enough as nose for the reindeers and secure the ends using hot glue. You can try this if you don't have pom poms.
DONE BY CHILD
* paint antlers, head, ears, and tail patterns
* paint craft sticks
* glue frame pieces together
* decorate and add details on reindeer frame
STEPS IN DOING THIS REINDEER FRAME CRAFT
STEP #1: Let child paint plant twigs or antlers with brown paint. Set aside to dry.

STEP #2: Next, mix paint creating a shade or color similar to a reindeer's body, then let child paint the craft sticks, cardboard ears, head, and tail. Set aside painted pieces to dry.

STEP #3: Once, painted pieces are all dry, Let child glue craft sticks together on all sides of each picture to create the frame and reindeer body.
STEP #4: Afterwards, let child glue eyes and the nose on the reindeer head. Next, the ears then antlers using hot glue (with supervision) to complete the reindeer head. Then add the tail at one end of the frame and the head on the other end using hot glue (with supervision). Attach a string at the middle back of the frame using hot glue to be able to hang it.
STEP #5: To complete the frames, let child add some hooves at the tip of frame or reindeer legs by coloring it with brown or black coloring marker.
And that's how you can easily create your own cute craft stick "Reindeer Frame". I hang the frames on the door inside our bedroom. It's looks nice as a decoration not just for Christmas but the whole year round. Get the kids creating their own cute and fun reindeer frame for Christmas or anytime!

Get books about "Reindeer" and more children's books @ thriftbooks.com
MATERIALS FOR THIS CRAFT
* regular craft sticks ; * pictures (to put in frame) ; * plant twigs resembling antlers or bamboo skewers (for reindeer antlers) ; * empty box cardboards ; * poster paints ; * paint brush ; * paint mixing tray ; * googly eyes (optional) * red pom poms ; * hot melt glue ; * glue gun ; * white glue ; * coloring markers ; * paper twine or string
I'D LOVE TO HEAR FROM YOU!
If you got any thoughts and questions regarding this craft, feel free to interact and write it down in the comment box below. I'd be happy to hear from you. Thank you so much for viewing and reading.
A little support goes a long way! If you’d like to help us keep creating, you can do so at https://ko-fi.com/kreativone


