Star Craft: Glitter Paper Stars | Home Learning Art & Craft Activity
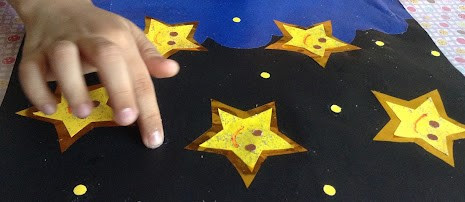
In this post, I will be sharing a "star" craft. This was a craft project that Lauren did in Brightly Beaming Resources' (Step 3: Sound of the Week) homeschool curriculum for the "st" sound as in "star", Click Here To Find Out Why We Are Doing Homeschooling. This craft is about creating a scenery of glittery paper stars in the dark night sky.
DISCLOSURE: This blog and post contains affiliate links. This means I may earn a commission should you chose to sign up for a program or make a purchase using my link. Thank you so much for your support!
REACH & GET THAT STAR! STAY FIT WITH A DANCE & A SONG!
Get the kids singing and moving with this action song about touching, grabbing, throwing and squashing the stars!
Touch the Stars - Fitness Song for Kids
Click Here To Watch The Video @ DAILYMOTION
Click Here To Watch The Video @ DAILYMOTION
READY FOR KID BEFORE STARTING ACTIVITY ALONG WITH OTHER MATERIALS
* cut star patterns
* cut cloud pattern
* hole punched construction papers
DONE BY ADULT OR PARENT
NOTE: This craft is a collaboration between parent or caregiver and child and is suitable for kids about 6 and above, you may adapt the process to the skill or ability of the child.
Trace the bigger stars on a gold or silver metallic paper aluminum foil with a similar shade to the smaller paper stars your child will make. (example: if you are using white paper for smaller star, you can use silver foil paper for the bigger star)
* Tiny Twinkling Dots | Stars: Punch construction papers, you may try other colors aside from what is shown using a hole puncher or a star shape puncher to glue around big stars.
DONE BY CHILD
* cut star patterns
* cut night cloud pattern
* glue stars on paper
* draw details on stars
STEPS IN DOING THIS START CRAFT
STEP#1: Let child spread glitter glue on the small paper stars using paint brush, they may use gold or silver glitter glue. Set aside to dry.
STEP#2: Next, let child glue large cloud pattern on any dark colored construction paper to create a "night sky" background.
STEP#3: Then, let child glue the bigger star patterns cut from metallic paper aluminum foil all around the background.
STEP#4: Next, let child glue the smaller paper stars on top of the bigger stars.
STEP#5: Afterwards, let child add and glue dots of papers as eyes on the stars.
STEP#6: After adding some eyes, let child draw a mouth of their choice on the stars using a coloring marker.
STEP#7: Finally, let child add tiny twinkling stars or dots all around the big stars.
And there goes your "GLITTER PAPER STARS". Get the kids creating their own version of this craft today! Below is Lauren's finished stars project.
* construction papers * hole puncher or star shape puncher * gold or silver metallic paper aluminum foil * gold or silver glitter glue * paint brush * solid glue stick * coloring markers
Below is a nice story video "Twinkle Little Star" by Sukey Mulloy. A story about a little star who was chosen to fulfill a wish of a child.
The Story of Twinkle Little Star - Star Story for Kids
Click Here To Watch The Video @ DAILYMOTION
Click Here To Watch The Video @ DAILYMOTION
I'D LOVE TO HEAR FROM YOU!
If you got any thoughts or questions regarding this craft, feel free to interact and write it down in the comment box below. I'd be happy to hear from you. Thank you so much for viewing and reading.
A little support goes a long way! If you’d like to help us keep creating, you can do so at https://ko-fi.com/kreativone


Comments
Post a Comment