
Food Craft: Birthday Cake Out Of Empty Box | Home Learning Art & Craft Project Activity
In this post, I will be sharing a "cake" craft idea. This was a craft project that Lauren did in Brightly Beaming Resources' (Step 3: Sound of the Week) homeschool curriculum for the "ay" sound as in "birthday", Click Here To Find Out Why We Are Doing Homeschooling.
DISCLOSURE: This blog and post contains affiliate links. This means I may earn a commission should you chose to sign up for a program or make a purchase using my link. Thank you so much for your support!
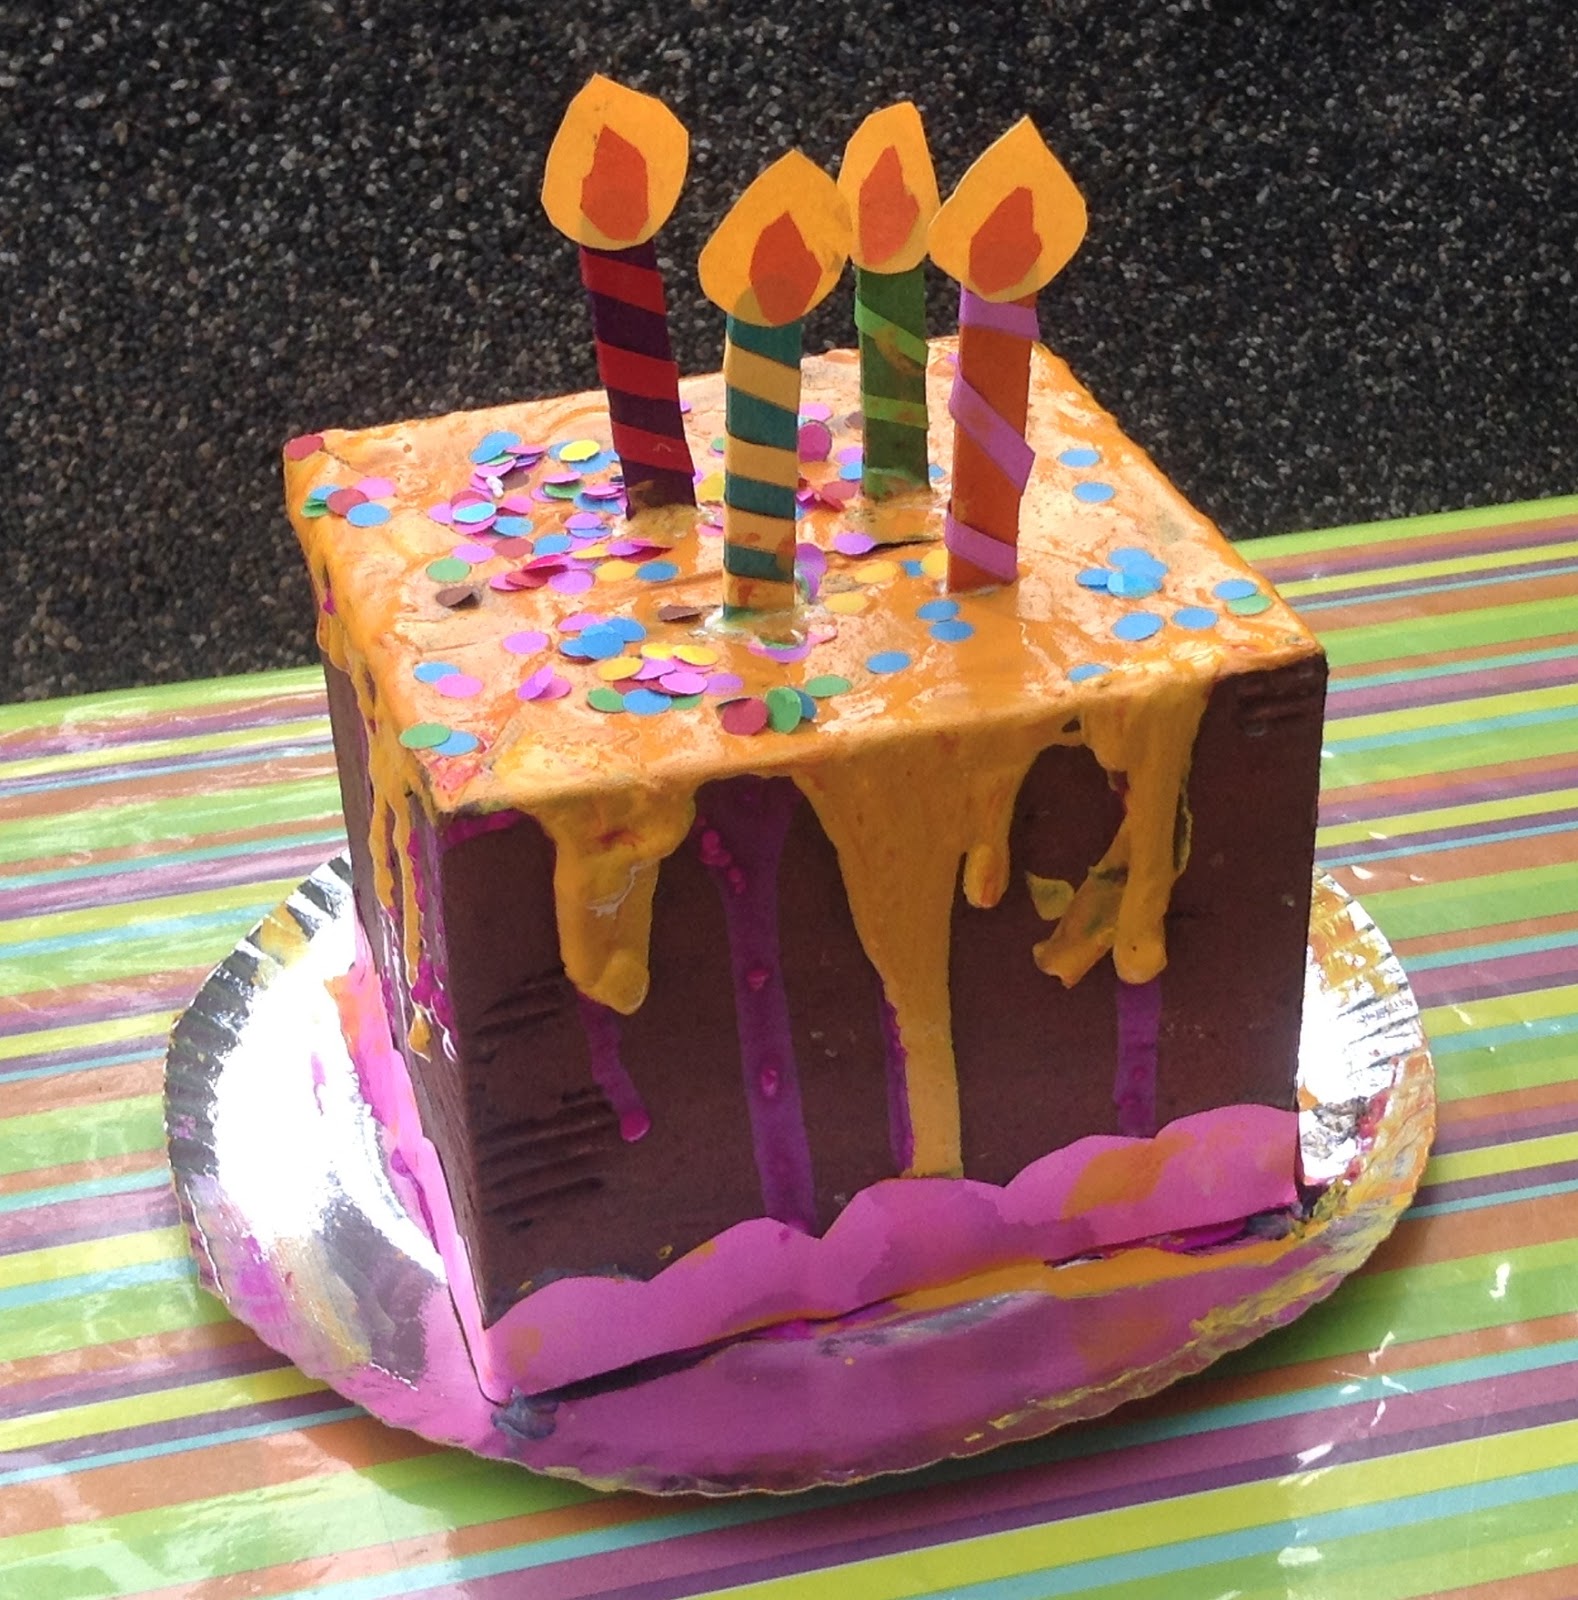
I thought about doing a "birthday cake" craft using an empty cardboard box for the cake with some syrup frosting made out of powder paint spilling on the sides and colorful paper sprinkles from construction papers sprinkled on top.
READY FOR KID BEFORE STARTING ACTIVITY ALONG WITH OTHER MATERIALS
* slice or cut on top of box to insert craft stick candles
* cut strips of construction papers
* cut cake detail pattern
* hole punched or cut tiny bits of construction papers
DONE BY CHILD
* paint box
* cut cake detail pattern
* cut flame and candle strip patterns
* glue cake pieces together
* decorate cake
* slice or cut on top of box to insert craft stick candles
* cut strips of construction papers
* cut cake detail pattern
* hole punched or cut tiny bits of construction papers
DONE BY ADULT OR PARENT
NOTE: This craft is a collaboration between parent or caregiver and child and is suitable for kids about 7 and above, you may adapt the process to the skill or ability of the child.
* CAKE BOX HOLDER: Take a paper plate, make sure the box you are using is smaller than the paper plate. If paper plate is a bit large for box, trim the edges to make it just right for the box you are using.
* CAKE BOX: Make some slice or cuts on top of the box depending on the number of craft sticks that will be inserted on it later.
* CANDLE FLAME & STRIPS: Draw a big and small flame pattern on an orange and yellow construction paper. For the strips around craft stick candle, take construction papers in any color of choice and draw thin vertical lines on it using a ruler.
* PAPER SPRINKLES: Take construction papers in any colors of choice and punched different colors and shapes of construction papers using a hole or shape puncher or simply cut very tiny and thin bits of colorful construction papers using a scissor.
* CAKE DETAILS: You may add details below the cake box, such as paper scallop pattern or any design of your choice. Draw pattern on a construction paper in any color of choice.
* paint box
* cut cake detail pattern
* cut flame and candle strip patterns
* glue cake pieces together
* decorate cake
STEPS IN DOING THIS BIRTHDAY CAKE CRAFT
STEP #1: First, let child paint cardboard box with any color of their choice. Set aside painting box to dry for a couple of minutes.

STEP #2: Next, take craft sticks and let child glue the strips of construction papers around it using dry glue stick.

STEP #3: Next, it's time to create the candle. Let child glue smaller flame pattern on bigger flame pattern then glue flame on top of craft sticks.

STEP #4: Once the painted box is dry, let child glue box on the paper plate using hot glue. Measure the box before gluing it and make a mark or guide on 4 corners, this way it will be easier to know where the dots of hot glue will be placed and for the box to sit in the right spot of the plate. Let child glue box on it.

STEP #5: Next, make a mixture of frosting syrup using powder paint in any color of choice. Mix just the right about of water on powder paint creating a mixture that is not too thin or too thick. If you can't find any powder paints in stores near you, you can also create your own by simply using sidewalk or colored chalk, Click Here For The DIY Powdered Paint Recipe. Let child pour syrup on top of box and spread apart to spill on sides of box using plastic spoon.

STEP #6: Next, let child add some paper sprinkles on top of frosting.

STEP #7: Then let child stick the craft stick candles into the cuts on top of box.

STEP #8: Finally, let child glue cake detail pattern below cake box using liquid glue.

And there goes your "EMPTY BOX BIRTHDAY CAKE". The finished cake looks fun and colorful like a real birthday cake. Get the kids creating their own version of this craft today!
MATERIALS FOR THIS CRAFT
* small or medium size empty cardboard box * poster paints * paint brush * paint mixing tray * powder paints or sidewalk colored chalk (to create a DIY powder paint) * small disposable cups (for mixing paint syrup) * plastic spoon * construction papers * hole or shape puncher * colored craft sticks * liquid glue * solid glue stick * hot melt glue * glue gun * ruler * paper plate
LEARNING IS MORE FUN WITH STORIES!
Below are read aloud stories about "cake" to watch and listen with your kids. These stories features rhymes, the purpose of a cake and how irresistible this sweet dessert is. It also features lessons such as being careful and self-control. Click on the storybook picture to watch the videos @ DAILYMOTION.


Get "Cake" by Sue Hendra & Paul Linnet and more children's books @ thriftbooks.com
I'D LOVE TO HEAR FROM YOU!
If you got any thoughts and questions regarding this craft, feel free to interact and write it down in the comment box below. I'd be happy to hear from you. Thank you so much for viewing and reading.
POST UPDATED: May 2023
A little support goes a long way! If you’d like to help us keep creating, you can do so at https://ko-fi.com/kreativone
Comments
Post a Comment