Doll Craft: Doll Out Of Plastic Ball & Bottle | Home Learning Art & Craft Project Activity
In this post, I will be sharing a "doll" craft. This was a craft project that Lauren did in Brightly Beaming Resources' (Step 3: Sound of the Week) home school curriculum for the "ll" sound as in "doll", Click Here To Find Out Why We Are Doing Homeschooling.
DISCLOSURE: This blog and post contains affiliate links. This means I may earn a commission should you chose to sign up for a program or make a purchase using my link. Thank you so much for your support!
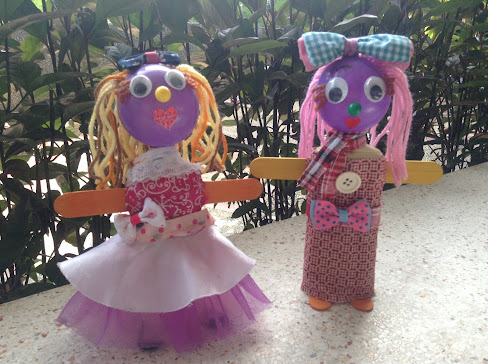
Lauren made this doll using a soft plastic ball for the head, an empty plastic bottle for the body and a jumbo craft stick for the arms and feet. Lauren glued clothes out of old fabrics and added bows on the clothes and hair taken from old clothes, hair clips and accessories that she didn't use anymore.
PREPARED & READY FOR KID BEFORE STARTING ACTIVITY ALONG WITH OTHER MATERIALS
* Plastic bottle with cut on both sides (to insert craft stick arm)
* Plastic ball with cut on top (to insert yarn hair)
* Cut jumbo craft sticks (for feet) of doll
* Cut mouth pattern
* Cut fabrics for clothes of doll
DONE BY ADULT OR PARENT
* Plastic bottle with cut on both sides (to insert craft stick arm)
* Plastic ball with cut on top (to insert yarn hair)
* Cut jumbo craft sticks (for feet) of doll
* Cut mouth pattern
* Cut fabrics for clothes of doll
DONE BY ADULT OR PARENT
NOTE: This craft is a collaboration between parent or caregiver and child and is suitable for kids about 6 and above, you may adapt the process to the skill or ability of the child.
* DOLL BODY: Take a small empty plastic bottle (preferably empty lotion or shampoo bottles). To be able to attach a craft stick arm, take a hand held cutter and make a cut on both sides of the bottle, just enough that the jumbo craft stick arm can be inserted through it.
* DOLL HEAD: Make a cut on the upper part of the plastic ball where the yarn hairs will be inserted into.
* DOLL MOUTH: Take a red or pink construction paper and draw a small mouth pattern on it. Cut the pattern.
* DOLL SHOES: Cut one colored jumbo craft stick (you may allow child to choose a color she likes) into a smaller size just enough as shoes or feet of doll.
* DOLL CLOTHES: Take some old or scrap fabrics and some old bows from clothes or hair accessories that you don't use anymore. Measure fabric around the bottle body and cut to create pattern for doll's clothing.
* DOLL BODY: Take a small empty plastic bottle (preferably empty lotion or shampoo bottles). To be able to attach a craft stick arm, take a hand held cutter and make a cut on both sides of the bottle, just enough that the jumbo craft stick arm can be inserted through it.
* DOLL HEAD: Make a cut on the upper part of the plastic ball where the yarn hairs will be inserted into.
* DOLL MOUTH: Take a red or pink construction paper and draw a small mouth pattern on it. Cut the pattern.
* DOLL CLOTHES: Take some old or scrap fabrics and some old bows from clothes or hair accessories that you don't use anymore. Measure fabric around the bottle body and cut to create pattern for doll's clothing.
DONE BY CHILD
* Insert yarn hair into ball head
* Glue Pieces/ Decorate Doll
* Insert yarn hair into ball head
* Glue Pieces/ Decorate Doll
STEPS IN DOING THIS DOLL CRAFT
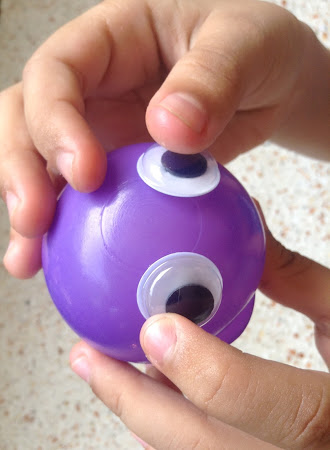
STEP #1: Let child choose any color of plastic ball they like and attach the googly eyes onto the plastic ball using hot glue. Put hot glue on the spot and assist the child in sticking the eyes on it. You may get colorful with the eyes and try a variety of googly eye colors and types.
STEP #2: Next, Let child attach a round push pin for the nose. You can either use a round push pin or a colored thumbtack for the nose. Let child choose what colors they like.
STEP #3: Next, let child stick the mouth pattern on the ball below the nose using glue.
STEP #4: Next, let child draw some eyebrow details using black permanent marker. Afterwards, cut some very short strands of yarn and let child glue it on the sides of the eyes to create the lashes. Put liquid glue on the spot and let child glue the yarn lashes on it.
STEP #5: Now, it's time to create the hair of the doll. Let child choose color of yarn they want for hair of doll. Cut strands of yarns and let child insert it into the cut on top of ball. They can use one color or combine 2 to 3 colors for hair of doll.
STEP #6: Next, let child attach the fabric or clothes and accessories on the plastic bottle body using hot glue. Put hot glue on the spot and guide child to glue fabrics on it.
STEP #7: Now, it's time to insert the craft stick arm, poke the hand held cutter onto the fabric until it cuts through the cut made on the sides of plastic bottle earlier. Let child insert the craft stick into the cut.
STEP #8: Next, let child glue ball head on top of the plastic bottle body using hot glue then let child add bow on top of the doll's head using hot glue.
STEP #9: Finally, let child glue the the craft stick shoe or feet below the plastic bottle to complete the doll using hot glue.
And there goes your "PLASTIC BALL & BOTTLE DOLL". Below is Lauren's version of doing this doll project. Get the kids creating their own version today! Kids may use this doll for pretend play.
MATERIALS FOR THIS DOLL CRAFT
* soft plastic balls * empty plastic bottle * googly eyes * yarns * round push pins or colored thumb tacks * red or pink construction paper * black pentel pen marker * liquid glue * hot melt glue * glue gun * colored jumbo craft sticks * utility knife * old or scrap fabrics * old or unused ribbons | bows * scissors
LEARNING IS MORE FUN WITH A SONG
Check out this mellow song "My Doll" that talks about playing with a doll.
My Doll - Doll Song for Kids
I'D LOVE TO HEAR FROM YOU
If you got any thoughts and questions regarding this craft, feel free to interact and write it down in the comment box below. I'd be happy to hear from you. Thank you so much for viewing and reading.
POST UPDATED: April 2023
A little support goes a long way! If you’d like to help us keep creating, you can do so at https://ko-fi.com/kreativone


Comments
Post a Comment